This page is a collection of things I’ve learnt about any techniques and components to build the car.
Caphead – a bolt, but with a circular head instead of hexagonal. Instead of using a spanner, you use allen key to tighten up.
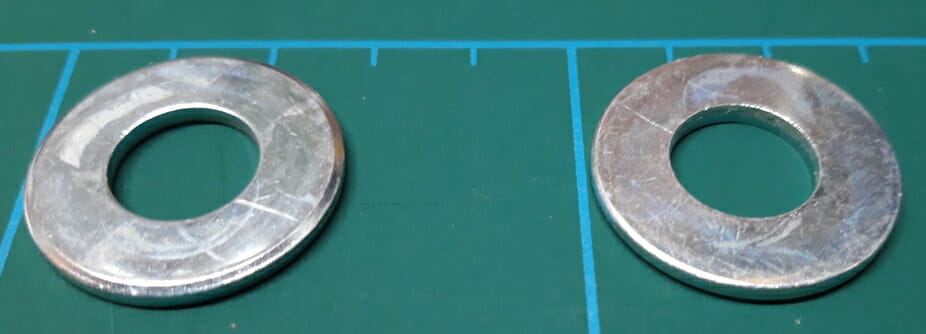
Chamfered – this is when an edge is smoothed out to a slope. Usually this applies to washers where you will see that one side of the washer doesn´t have an edge to it
Copperslip – This is grease mixed with powdered copper. Normal grease will melt at high temperatures, whereas this is heat resistant thanks to the presence of the metal. You apply this to the bolt thread and/or body. It an also be used on the back of brake pads to stop squealing brakes. Copperslip can make it easy to get bolts into tight places, such as fitting wishbones, A frame, differential etc. (along with liberal mallet use). It will also make nuts/bolts easier to undo for maintenance etc and provides some protection from weather. It’s a lubricant. There is a degree of debate on how much of the build to use this on. I took the approach of using copperslip wherever the manual indicated it should be used (there is a small icon on each page where Caterham recommend using it), and maybe one or two other places tops. Wherever I used copperslip, I indicated in the text. Some builders seem to apply copperslip to most bolts. I’m not sure there is a right or wrong answer. The one thing you probably wouldn’t do is use copper slip on bolts which you applying loctite on. The use of copperslip will also affect how difficult the bolt is to tighten or loosen, as it is a lubricant. Bear this is in mind, for example I didn’t use any copperslip on the engine parts because I don’t want them easily coming undone! You need to take copperslip into account if you are torquing a bolt which is NOT marked as having copperslip applied in the manual. Torque values are typically specified for dry nuts/bolts. You may want to err on the lower side with the torque if you have applied copperslip to a bolt which is not marked as having copperslip applied, perhaps 80-90% of the torque value …. but I am NOT an expert… ask someone more qualified if you intend to do this because there are obviously safety implications.
Crossthread – if you try to force a nut onto a bolt and the threads don´t align properly you can cut a nut thread. This is very prone to happening when a nut meets a bolt at an off angle. This compromises the nut/bolt and needs to be avoided. Best solution is to use your fingers to do the first few turns on any nuts/bolts before using tools to tighten once you are sure thread correctly aligned.
Derek – Weird place to put this but I would just mention that someone called Derek Howlett used to work at Caterham and was their main point of contact for amateur builders in the event of problems. His contact details were in my copy of the manual. Just a note to say that he left the company in mid-2020, but Caterham now have other people available to contact if you have issues.
Econoseal – these are the plastic adapters that wires go into. Protects against water. You can get various tools which help assemble and strip these connectors if you need to do upgrades to the electric.
HSS Drill bit – HSS stands for ¨High Speed Steel¨ and typically refers to drill bits that are suitable for drilling through metal (as opposed to wood or masonry)
IVA – Individual Vehicle Assessment – this is the government test for new cars, similar to an MOT but a bit more in depth. You need to pass this for the car to get licence plates and be road legal. You can ‘present’ the car yourself and lots of builders do, however I can’t stand bureaucracy, so I got the dealer I bought this car from to present it for me.
Loctite/Threadloc – This is like glue for nuts and bolts. If you apply some loctite (the one I used was a blue liquid) to the thread of the bolt and then tighten it will ‘set’ similar to glue. This means if you need to torque up a bolt with threadlock, make sure you torque it immediately, don’t come back to torque later. Torque upon application, and then leave it to set for 24 hours or so. If you need to undo the nut/bolt, then clean off all the old theadloc and apply new. Various different types of Loctite are available – 242, 243 and 248 all available. Caterham recommend 243 so I’ve gone with that.
Nyloc nut – this is a nut with a nylon insert which is a bit like using threadlock. When you tighten up the bolt, it will bite into the nylon. You shouldn’t reuse these or tighten/untighten unnecessarily. Blue insert tends to be metric, white insert tends to be imperial. Not used with spring washers
PBC – Post build check – once you’ve finished building you get the car checked over by the dealer you bought from, or Caterham themselves, before sending for IVA. The main point of PBC is to check the car is safe and to fix any mistakes in your build.
Plain washer – used to adjust spacing, to spread load from a nut/bolt on a softer surface, and/or to help make a rough surface smoother for nut/bolt. Large diameter/thin plain washer is used to spread load onto very thin material.
Socket Set – A collection of sockets that you can put onto a wrench (typically supplied in the ‘socket set’) or torque wrench (typically bought on its own). Wrenches and sockets come with different ‘drives’. The drive refers to how thick the connector is between the wrench and socket. The main drive sizes are 1/4 inch, 3/8 inch and 1/2 inch. Generally speaking, the higher the drive, the more torque (tightness) you can put down it. The lower the drive, the smaller the nuts/bolts you will be doing up. So for 5mm nuts, you will be using a 1/4 inch wrench/socket, not 1/2 inch. You won’t even be able to get a 5mm socket to go on a 1/2 inch drive wrench. Likewise, if you need a 19mm socket, you wouldn’t use a 1/4 inch drive on that, more likely a 1/2 inch drive. 3/8 inch is a nice middle ground, and I used that size drive a lot on this car.
Spring/Split washer – this is a washer with a split in it, looks like a cross between a spring and a washer (hence the name(s)). Idea is that it should prevent a nut coming undone, because it digs into the nut so if there is any vibration, the washer will help stop it undoing the nut. Usually this will be next to a bolt or nut, then there will be a plain washer – ie a spring washer shouldn’t be coming into contact with the car body. Generally not to be used with Nyloc nuts, as with nyloc the nylon insert provides the resistance
Torque – this is doing up nuts to a certain N.m (Newton Meter) measurement – you can think of this as ‘tightness’. If you need to torque something use a torque wrench which you can set to a certain value and it will then click as you reach that level of ‘tightness’, prevent you putting more power down it. When torquing up, ensure bolt is the correct length, if you use a bolt that is too long it may strip the thread on the bolt. Once you have torqued a bolt, mark the head with paint/torque pen. It is helpful to extend this mark onto nearby metal, then you can easily see if the bolt has loosened. Make sure you stop when you hear the first click on your torque wrench to avoid overtightening.
Trickle Charging – this is when you leave a special battery charger hooked up to your car battery for days/weeks/months while the car is not being used so that the battery doesn’t run flat in that time.
Safety :
Not that I’m one for the boring stuff, but will do simple stuff. Use eye protection. If drilling or working with volatile chemicals use a face mask. When applying glue, grease and any other chemicals will use disposable latex gloves. Use work gloves wherever possible. If working with sharps use slash proof gloves.
Other rules :
- Don’t apply any tape to painted surfaces of the car for significant period of time
- Protect bodywork with cardboard/ bubble wrap and don’t be lazy about it
- Caterhams are constantly changing. That´s why the manual is often out of date.
- Check bolts fit before attaching relevant part. Holes may need to be filed slightly or drilled out.
- Be prepared to use force from time to time. Rubber mallet is very useful.
- Some powder coating will get damaged. You can go over it with Hammerite black paint
- Don´t expect everything to align. My car was frequently out by 1-2mm and it was incredibly frustrating.
- It will go together eventually, patience is key to making it work. Try to enjoy it, even when you want to put a sledgehammer through the windshield!
- Everything is hardest to do first time, with components with eg left and right, the second time is much easier
- You will make plenty of mistakes, try not to let them distract you and if necessary take a break after messing something up to avoid making it worse!
- It is easier to scratch and damage the body paintwork than you think – overprotect and think every action through before you do it to make sure you are not scraping against something.
- Don´t throw anything out. If you think you don´t need a nut/bolt/washer etc, I keep it in a freezer bag
- Purchased a load of small plastic boxes to put the fixing packs into (eg Pack A, Pack B etc). I then stack these on work bench and lot easier to grab what I need.